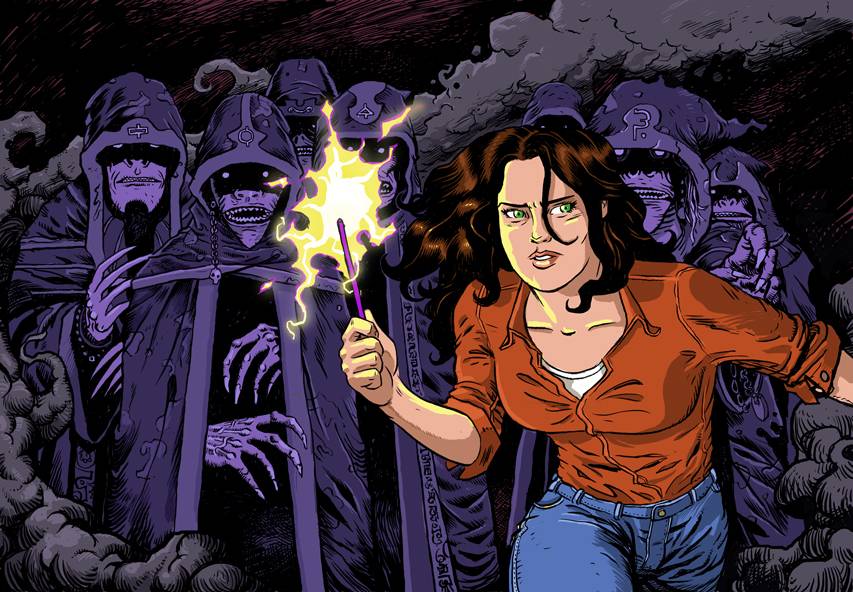

Ahead of the Oct. 31 release of Amelia Cole and the Unknown World #4 from Monkeybrain Comics, artist Nick Brokenshire has provided ROBOT 6 with a look at his process for creating Page 4 of that issue. If you're unfamiliar with the series, by Brokenshire, writers Adam P. Knave and D.J. Kirkbride, and letterer Rachel Deering, the first three issues are available on comiXology.
A wee while back, my friends Adam and DJ asked me if I fancied doing a process diary-type thing for Comic Book Resources. I was surprised because I am a new artist in the wondrous world we know collectively as “comics.” Of course, what with our book being picked up by Monkeybrain and put out on comiXology, I said yes. We are obviously in the business of drawing attention to our work so that we can sell copies which in turn will allow us to make more comics. … But that isn’t the real reason that I want to share this little snapshot of the way we do things. The main reason for me is: love of the process. Even as an unknown, I relish the chance to share the little I have learned with anyone that may enjoy or benefit from this information.
A few years back while I was training to be a high-school art teacher (which is what I do as a day job now), I stumbled upon the revelation that the only way to achieve anything is by starting. I had been drawing comics characters and chopped-up bits of comics but never managed to finish anything. Then, upon listening to the experiences of professionals on podcasts like Word Balloon and Art and Story, as well as interviews on blogs and magazines, the same little snippet of advice kept popping out: start. Start to write and start to draw. After you start, don’t stop. Even when you don’t think the work is that good, don’t stop. That’s the only way to get better. So I started and I think I’m getting better. I’m a long way from being as good as my heroes, but I’ve made a start. So, for those of you who want to make comics, whether you dream of super-stardom or like me, just like to tell stories, here’s a brief breakdown of the process I go through to make comics. Hope it helps you start.
Stage One
I walk into my little studio and sit down. I get my tools of the trade and then I, that’s right, start.


Stage Two
Adam P. Knave and DJ Kirkbride, my aforementioned chums and writers of Amelia Cole, send me a script that I proceed to sketch out in VERY rough form so that we can establish the layout and flow of things on the page. Normally, artists will proceed to make a more refined layout after this stage but because of the time constraints we labour under (we all have day jobs and deadlines to meet), the lads put their faith in me, allowing me to move straight onto Stage Three. Here is the extremely rough “rough” for Page 20 of Amelia Cole #4.

Stage Three
After the boys give me the go-ahead, I do the pencils. Not surprisingly, I use a pencil to do this. I work on A3 Bristol Board (roughly 11 x 17 for non-Brits). Now, if a page has a lot of buildings and complicated stuff going on, I will work to make the pencils quite “tight” meaning, not scruffy. I do have a predisposition to work quickly, which means that when possible, I will pencil only enough to allow me to know what to aim for in Stage Four (inks). Remember, I do the all the artwork, pencils, inks and colours, so I have to move fast to meet deadlines. Usually pencilers have the luxury of being able to put more time into their work because they send them to an inker for finishing, but I can’t, so it’s all about the speed!

Stage Four
Now I have to scan the pencils into my steam powered, souped-up Commodore 64 computer… Well it might as well be, it’s that old.
I import the pencils into Photoshop where I make adjustments to the art if needs be and then convert them into either blue-line or red-line as you can see below. I print the page out like this and move onto Stage Five. By inking onto blue or red-line, I can then scan the inked page and use Photoshop to completely remove the blue/red pencils leaving nice crisp inks. Yummy.

Stage Five
This is my favourite, and also the scariest, stage. Laying down inks is fun when you get in the zone, but inevitably, there are mistakes that then need to be corrected either on the page or in Photoshop. I’m sure there are super-duper artists who can ink a page without needing to fix things … I can’t! Now, my tools for inking are the lovely Windsor and Newton Series 7 Sable brush for large foreground things and then super robust W Hughes 304 dip pens for backgrounds although on the page below, I only used the brush. Swoosh!

Stage Six
I scan the inks at a very high resolution, which causes my computer to make noises one might hear in a Wookiees boudoir very late at night after a few pints of Tatooine Ale with Mustafar Bottom Burners as chasers. Usually at this point I have only a couple of weeks to do the colours for a 22 page book so I have to, as we say in Old Blighty, “Get a wiggle on.” That means, work very fast. The Amelia Cole team agreed early on that the story needed to be bright and cheerful (for the most part) and visually accessible to all ages, so we settled on quite a light palette with very few gradients and airbrushy things. Flat colours, basically. Saying that there are a few varied tones on this example because it’s splash page and we wanted to be fancy. Ooh! Ahh!

After I finish the colours, we fire the pages over to our wonderful letterer, Rachel Deering, via the magical Inters-Net. Then the fine people at Monkeybrain Comics turn it into a comic that you, my friends, can purchase at comiXology. Fun, right?
So there you go. I hope you enjoyed my little explanation of how Amelia Cole and the Unknown World is produced.
Ciao, babies.
Nick Brokenshire